Thursday, June 21, 2012
I have a purchasing problem
I have a purchasing problem anyone who knows me knows I can’t resist ski gear. In fact it has been said I like gear as much as a like to ski. This may be true I always end up with new skis each season and it’s not my fault. It’s the manufactures fault if they didn’t put out new skis every year I would not have to get new skis every year. I love gear and even though its summer I’m thinking what do I need to add to my quiver next year. It’s not too early to figure out what you want or need for next season, besides skis don’t get jealous when you look at another pair or bring another pair home with you. So start thinking what you need, I need something for groomers something skinner like 90 to100mm under foot and maybe a big mtn charger or maybe a ski that is 130mm under foot for powder days may be a shorter twin tip for skiing with my kids maybe…………………
Thursday, May 24, 2012
The Sandwich is Made
Let’s Make a Sandwich
The time to build has finally come! I made some adjustments to the ski by tweaking the tail rocker profile a little and softening the flex slightly. This ski should be a blast. The final Dimensions are 140-118-130. So the building process finally came. I have seen pictures and videos of how skis are made but to actually help do it and watch in person was awesome. From first appearance, it looks easy, but as you begin to build you realize how delicate a process it really is. Absolutely everything must go together correctly or the ski will not turn out. To help illustrate the process check out these pictures.
Step 1. Mill the core profile. It’s amazing how shaving some wood off the core changes the flex of the ski.
Step 2. Cut out the bases. We had a base template made so the bases could be cut exactly to fit the mold and match the shape of my ski. I picked a cool Bluehouse Base that said made in the USA.
Step 3. Wax the mold. You actually wax the mold before everything goes in it so it comes out smoother. You have to make sure there is no excess wax in the mold or it can ruin the ski.
Step 4. Put the base and edges in the mold.
Step 5. Epoxy, fiberglass and rubber along the edges.
Step 6. Core side walls, tip and tail spacers and more epoxy.
Step 7. Place second layer of fiber glass carbon stinger from tip to tail. There is smaller layer fiber glass added for mounting reinforcement and then more epoxy
Step 8. Add the top sheet with great graphics.
Step 9. Put the top on the mold and put it in the press and bake for 45 min.
Step 10. Take out of the mold and let it cool and come back the next day to cut it out.
Step 11. Cut access material off of the ski. It no longer will look like a giant rectangle.
Step 12. Sand, smooth to take out the rough spots
Step 13. Now you router the sidewalls.
Step 14. Send to a shop to have the bases structured.
Now they are done! I’m just waiting now to mount them up and ski them this weekend. It was great to see it all come together. I can’t wait to ski them and see how they turned out.


 n-right:1em; margin-bottom:1em">


Sunday, April 8, 2012
Ski Grphics Like its 1987

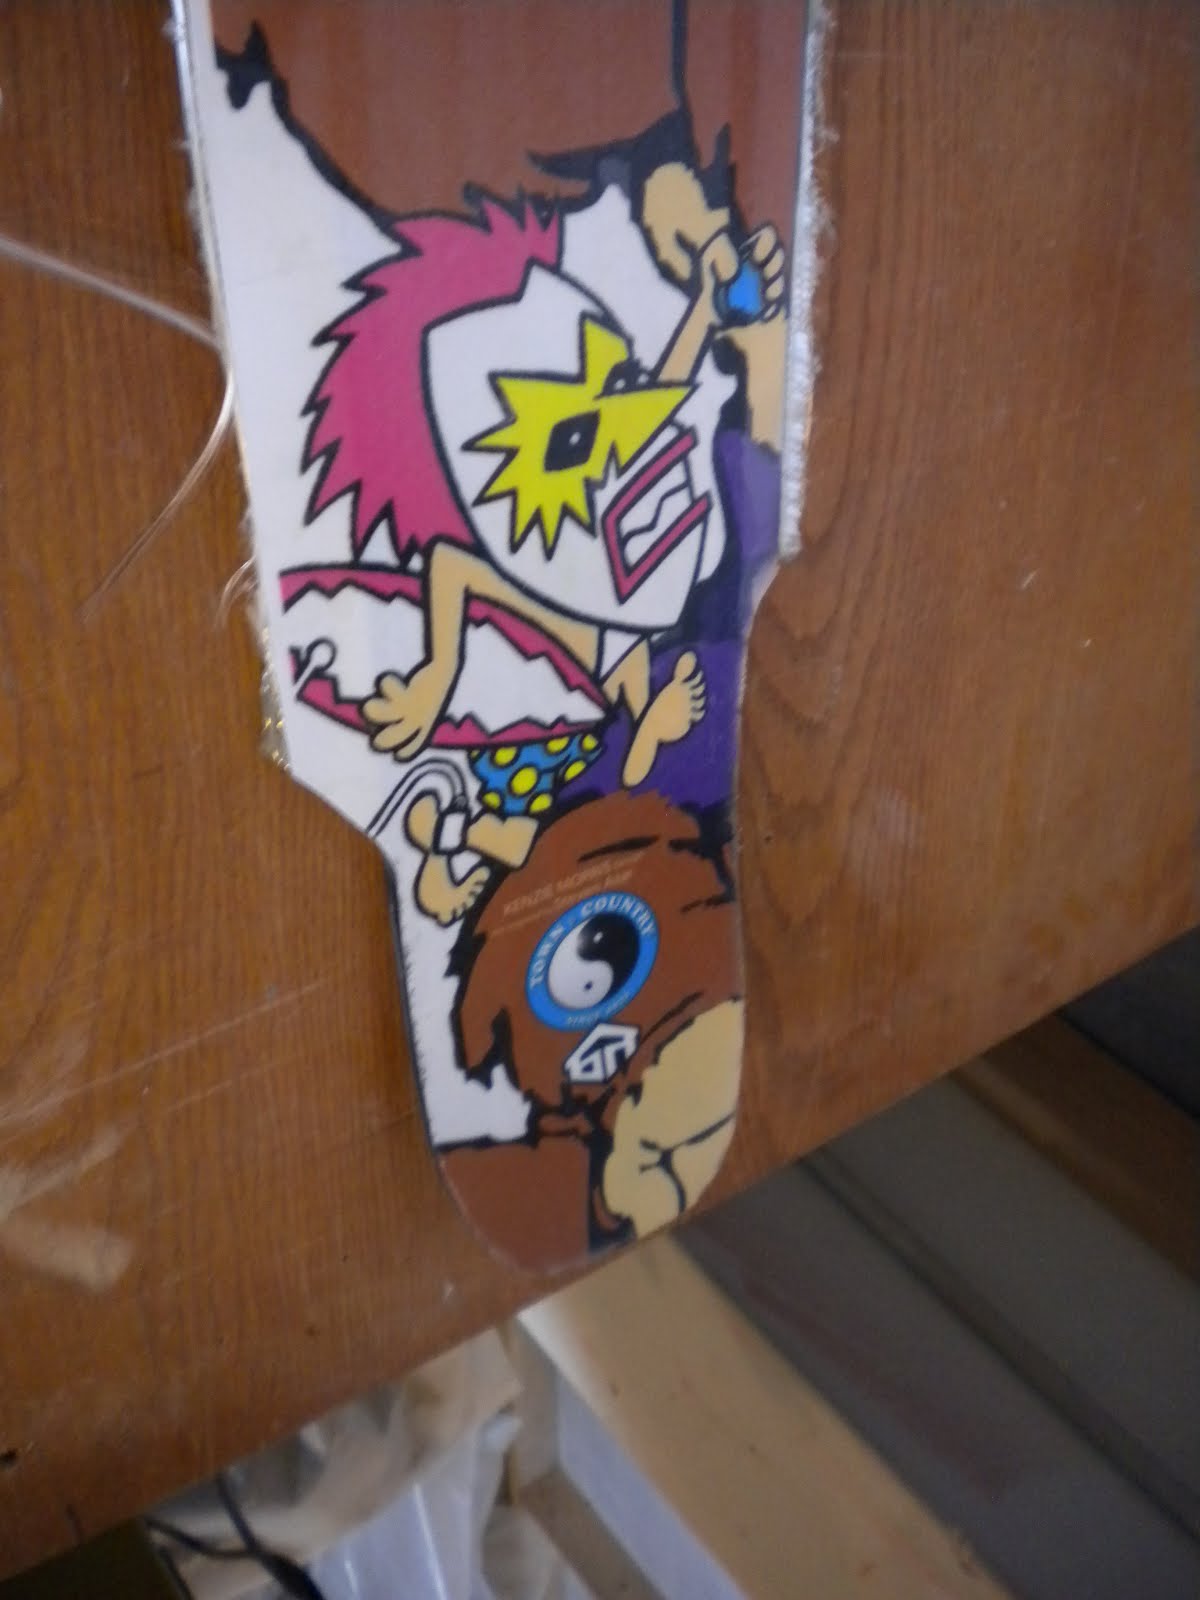
If you got to pick what goes on your top sheet of your skis, what would you choose? I think there are some great graphics out there and others that just stink. However someone may hate what you like and vice versa. I am sure some people will find my graphics disappointing. It seems the older I get, the COOLER the 80’s get. The 80’s had some great movies and TV shows, great music, and my favorite colors of all time: NEON. For me, there was also the great Town and Country Surf design. My uncle was a rep for them back in the day and I had my share of their merchandise. I loved the characters and bright colors of the surf themed designs. I thought I was so cool in those shirts…and let’s face it…I was! If you don’t remember them, take a look at this link: http://stevenazar.com/tcsurfdesigns4higherres.html . Those characters were drawn by Steven Nazar. If you don’t recognize these characters you can check out his website. He had some other well known and great t-shirt graphics out there back in the day. I am excited about my graphics and I will post a picture of the final graphics once it is all put together. I want to give a shout out to my co-worker and graphic designer Kenzie Morris for helping me put my vision together. You rock Kenzie!
The length of my ski will be 186 with dimensions of 140-115-131. Tip rocker and small tail kick. The flex should be a medium tip and medium/stiff underfoot with a stiff tail. I want a Dynastar XXl type ski with a bit more side cut, tip rocker and a similar flex (maybe a touch softer). The building process should start next week and I hope to be cruising down the mountain on these skis by the end of the month. Can’t wait to see the finish product.
Wednesday, March 21, 2012
Materials and more Materials.
The second ski class was based around materials and what goes into a ski. They asked us to watch videos of skis being made before class to get a idea of how the process works. The style of construction used is called sandwich construction. You literally build the ski layer by layer. You start with the base and edges then run rubber strips along the edges and add fiber glass. Then you follow that by adding the core and more fiber glass and carbon fibers if that is what you choose. You then add side walls, tip and tail spacers and more fiber glass over the mounting area and then the top sheet. I am not sure this is the exact order but its close. We also discussed the weight of skis and how each material affects the weight of the skis. The types of materials we will be using are Poplar core, 2.0 mm edges durasurf bases, UHMW top sheets and sidewalls, Carbon fiber and Fiber glass.
The most interesting part of class to me was talking about core profiles. I just figured the flex of the ski was determined by how much fiber glass you used rather than the core profile. We were shown on a graph 2 core profiles. One was a symmetrical core that had a buildup in the middle of the ski, giving it more of an equal tip and tail flex. The second was a traditional core where the buildup was moved back from the center of the core giving the ski a more traditional feel. We also talked about how milling just a fraction of the tip or tail or waist will change the flex. The flex can also be altered by the weight of the fiber glass, carbon and how much of each you use in building the ski.
Overall, it was a great class and I’m looking forward to getting started. I have been trying to decide which type of ski to build. As of now, I think I’m going to build something around 188 cm in length and a 115 mm waist. This is more of a charger directional ski that will compliment my current quiver of skis quite well. I have an idea of my graphics, the rocker and camber profile and the flex I want out of this ski. Let’s get started!


Sunday, March 11, 2012
Ski Building 101
About 3 weeks ago, I got a email from Jared at Bluehouse Skis telling me they were going to start a ski building class and he asked what I thought. He explained that the class would be 8 weeks long and anyone who did it would get to design a pair skis from start to finish. The first session of classes will be the pilot classes to see how things will work and to see what adjustmens will need to be made for future classes. During the classes, a person will get to design a mold, pick the materials, pick the graphics and chose the rocker and the camber profile of their skis. You get to make two pairs of skis total. You get to design one mold and then pick one of theirs molds to make the second pair. They will help you build the first pair of skies and if you choose, you can build the 2nd pair on your own. After getting to ski on the 191 Pricint with the new rocker profile, I was sold. They skied great! So sign me up. This is something I have always wanted to do.
The first class started last Thursday. We talked about what kind of skies we would like to design, had a tour of the shop and received a overview of the different equipment and materials we would be using. And so it begins. I have my homework and I have a friend, Kenzie Morris designing my graphics for my skis. I have two ideas I'm trying to decide between. I am either going to make a all mountain ski with a 110 mm waist, tip rocker and tail kick or a powder ski with 125 mm waist. I just am not sure which to make. I am also interested in making a ski that is similar to the Pricint but I would change the flex and chop 5cm off the tail. You can comment if you have any opinions. I will be documenting the whole process from start to finish on my blog describing the experience and posting pictures. Should be a great time and a interesting journey.
The first class started last Thursday. We talked about what kind of skies we would like to design, had a tour of the shop and received a overview of the different equipment and materials we would be using. And so it begins. I have my homework and I have a friend, Kenzie Morris designing my graphics for my skis. I have two ideas I'm trying to decide between. I am either going to make a all mountain ski with a 110 mm waist, tip rocker and tail kick or a powder ski with 125 mm waist. I just am not sure which to make. I am also interested in making a ski that is similar to the Pricint but I would change the flex and chop 5cm off the tail. You can comment if you have any opinions. I will be documenting the whole process from start to finish on my blog describing the experience and posting pictures. Should be a great time and a interesting journey.
Sunday, February 26, 2012
And we are Back
I tried to start this a year ago, however I started a new job and I didn't end up with a season pass (last season we had record snow and it felt like I missed all the good storms with what day passes I had due to work and other reasons). Overall last season was good though. I got two great cat skiing trips and got to ski at Snowbird for my birthday (technically the day after which was July 2nd). After a two year hiatus, I am thrilled to have a season pass again, even if the snow isn't the greatest this year. There is nothing like heading up the canyon to Snowbird with that pass dangling from around my neck. I have a great wife who lets me out the door to ski even with two small kids at home.
Its hard to believe that 15 years ago Bob Woods took me night skiing and that event has forever changed my life. In the last 15 years skiing has influenced my choices in career, friends, spending time and money and how I view life. Its been an amazing journey and the snow conditions this year could dampen my spirits, but I am just grateful to ski.Why waste my time complaining when I could be skiing. There is a lot still to come in this season to look forward to and if all goes well, there will be at least 3 more months of skiing, a 3 day cat skiing trip, new boots to break in, testing skis from a local ski company and maybe even learning how to build a pair of skis myself. So pray for snow and get out there and ride.
Its hard to believe that 15 years ago Bob Woods took me night skiing and that event has forever changed my life. In the last 15 years skiing has influenced my choices in career, friends, spending time and money and how I view life. Its been an amazing journey and the snow conditions this year could dampen my spirits, but I am just grateful to ski.Why waste my time complaining when I could be skiing. There is a lot still to come in this season to look forward to and if all goes well, there will be at least 3 more months of skiing, a 3 day cat skiing trip, new boots to break in, testing skis from a local ski company and maybe even learning how to build a pair of skis myself. So pray for snow and get out there and ride.
Subscribe to:
Posts (Atom)